Amazon Prime

Showing posts with label Crochet. Show all posts

Sunday, 5 February 2017

Crochet Toadstool Mushroom


As I type this, it's Thursday. However, you'll see it after I get back from my weekend trip to the beach with my sister. We're going for a long walk and scramble about the dunes. We'll also have some time playing in the woods. This is a much needed day out for both us. One of the things I plan to do while there is taking lots of lovely outdoor pictures. UKSN, the group I am part of, has a completion to take a picture of your membership coin outdoors and I want to join in.

Last night, when thinking about what to pack in our picnic I suddenly got an image in my head of a little red and white crocheted toadstool, nestled in some real nature. I knew I had to make that picture real. It was one of those moments where I HAD TO MAKE IT IMMEDIATELY. Does anyone else get those? 

So I crocheted a toadstool as I saw it in my head. It's not exactly amigarumi, as I prefer the texture of mixing stitches. I liked it, but thought I should make another one, slightly different as mushrooms are never uniformly the same. What do you think? I feel like making hundreds of them, but I have no idea of what I would do with them all afterwards!


Friday, 23 December 2016

Crochet Christmas Wreath


I finally finished my crochet wreath. About a week ago, but this is my first moment to blog about it. I'm actually really happy with how it turned out. It probably ended up being a tad too long, which is why it puckers slightly around the middle of the ring, but I've never been one to chase absolute perfection when I crochet. 

Originally when I first started making it, two Decembers ago, I was planning on leaving it stripey and plain. After having it up for a week, I think I'll definitely be adding some Poinsettia and Holly leaves next year. All crocheted, of course. Maybe teeny tiny fairy lights too. We'll see how it evolves over the years! 

Well, that's all I wanted to say besides to wish anyone who reads this a very Merry Christmas and a Happy New Year!


Tuesday, 6 December 2016

My Tree is Up and I made a button garland!


It's the earliest I've ever put my tree up, but I have so much going between now and Christmas it had to be done! This is third year I've put my crochet baubles and chains on the tree and I still love them as much as when I first made them. I'm not one to change themes every year. Christmas is a time for traditions in our house, I like the familiarity of using favourite ornaments.


Although, there are always decorations that start to look a little shabby when you get them out of hibernation. When they need to be retired I make something new, and preferably crocheted, to take their place. So my decorations are getting progressively yarnier. But as a child of the 80's I will always insist on at least one piece of tinsel in my house.

For my new decoration this year, I made a simple button garland. It was just a very long chain of cream yarn, with assorted red and green buttons every ten chains. It's hanging above an arch in my house and I added a home made felt and scrap ginger bread man in the centre and a felt Father Christmas and snowman at either end.


The chain garland itself is very quick to make up. It would be a good family craft to make with any little budding crochters, and I think would also look lovely decorating a tree or woven amongst bigger evergreen garlands.

What do you think?

I'm also 90% finished on my crochet garland wreath. It's currently hanging on my ironing board while I find the time to sew it together up the back. I'll do it tonight, honest! I was thinking I might add a poinsettia in a red shimmery yarn? Or maybe holly and berries? I'll post pictures of whatever I decide, but any input is always welcome.


How is everyone else doing with their festive crocheting and crafting?


Friday, 4 November 2016

Crochet Bobble Hat for Woody


My one year old loves his Woody doll, and gets quite stressed if he's hatless for some reason. 'Hat!' Is one of his favourite words. He enjoyed Halloween shouting 'Witch!' Hat!' Repeatedly.

The only problem with his much loved Woody doll, which he pronounces as Wood-oo (sooooo cute), is that the cowboy hat he comes with is quite awkward to get on his head. It's made from fairly stiff plastic and frequently pops off. My little one isn't quite dexterous enough to put it back on himself so I must have Woody thrust in my face with a demand of 'Hat!' at least one hundred times a day.

Enough was enough, so taking a small break from yarn bombing crochet work, I whipped up a bobble hat for Woody that little hands can pop on his head with no trouble. I wasn't sure if his new hat would be accepted by my little monkey, but he smiled his head off when I popped his Winter replacement on. 'Wood-oo Hat!'

Tuesday, 11 October 2016

Yarn Bombing, Christmas Crochet and Ideas Explosions

I'm part of a local crochet group that is going to be doing some yarn bombing at Christmas time. I don't know how much I'm actually allowed to say, so I won't go into too many details yet, but I will say that I am extremely excited - and that it involves a lot of foliage.


I picked up my yarn at the end of last week and it's unlocked all of my festive crafting feelings. I'm getting so many ideas that my trusty green Moleskine notebook hasn't left my side in days. It's being steadily filled with notes, pattern ideas, doodles and revisions. Christmas is always my biggest crafting muse, but as crochet projects tend to require time as much as yarn, I usually start my festive crochet in October.

At the moment I'm working on the yarn bombing foliage, see the holly perched on my snazzily pyjamaed knees, and a jumper of my own design. I'm writing the pattern down as I go, and also frequently frogging and changing so I would be amazed if anyone but me could make sense of my notes at the moment. It's not a Christmas jumper but the idea for it came to me amongst this creative flood and I was so excited I just had to start straight away, but there are so many other ideas begging me to make them real too, it's hard not to have ten projects on the go at once.

Does this happen to anyone else?


Friday, 22 July 2016

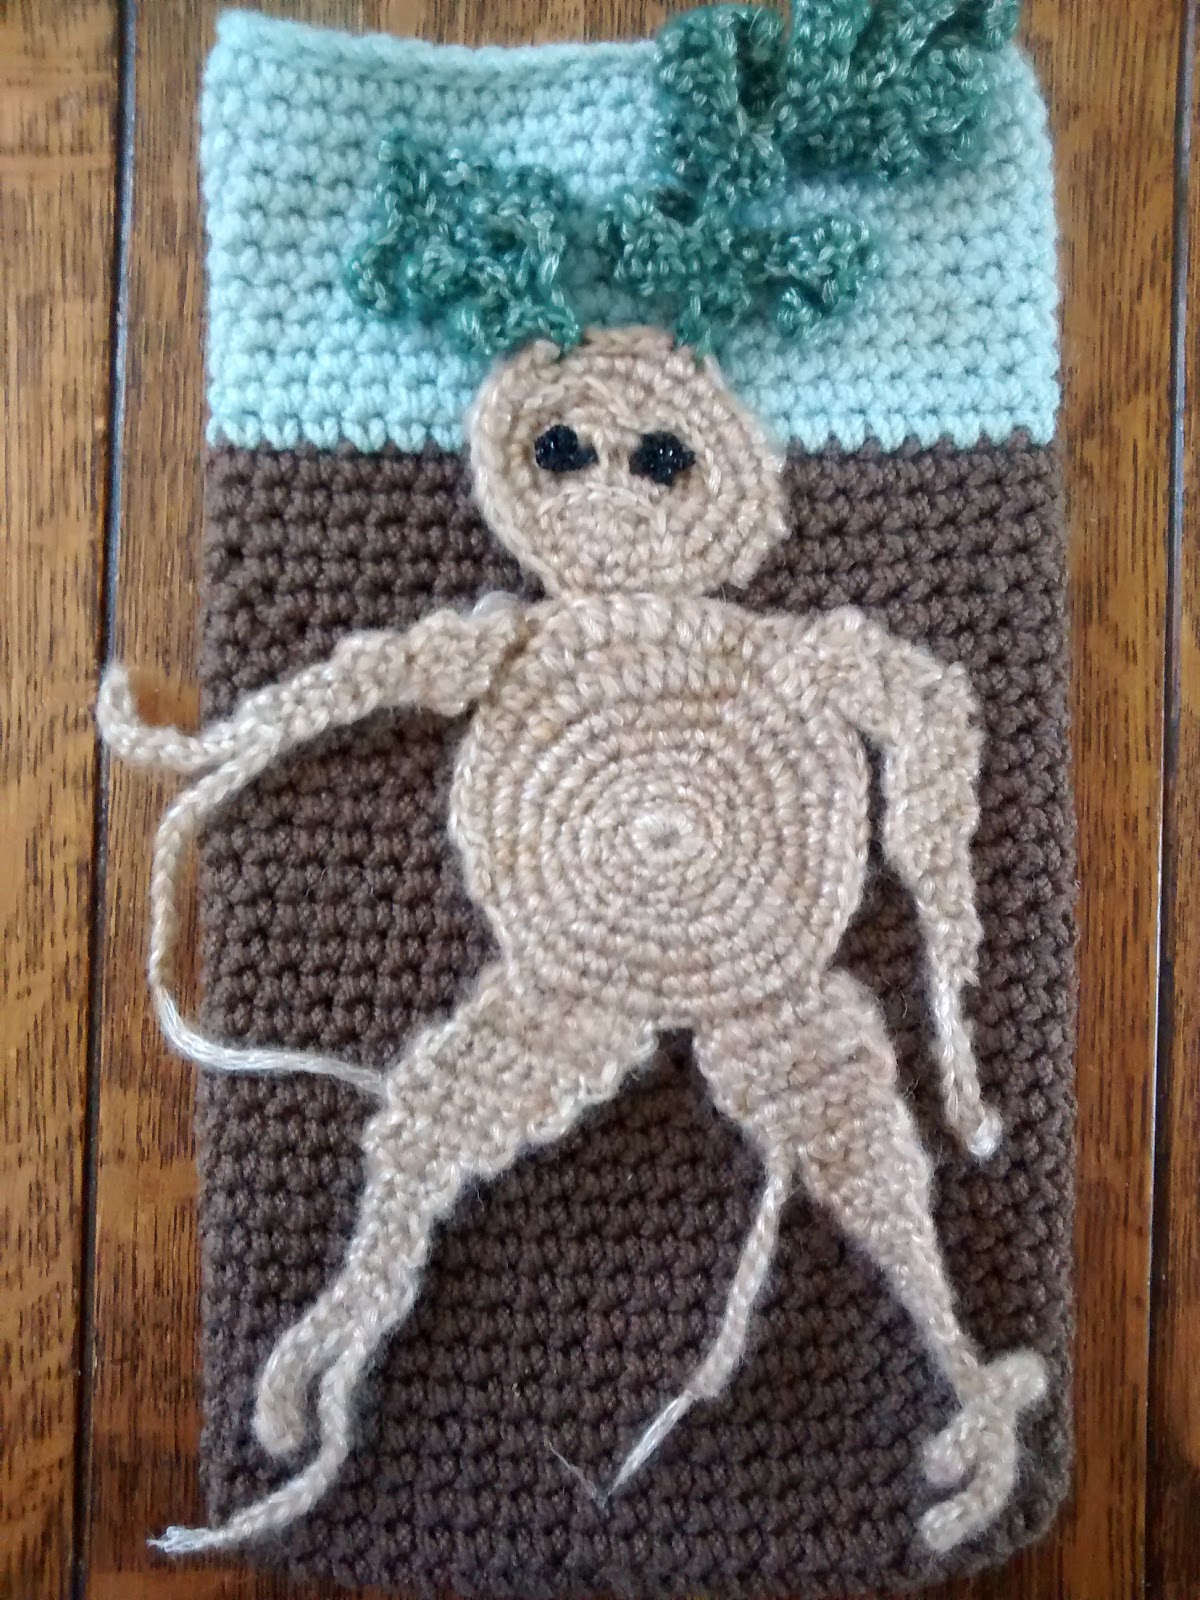
Crochet Mandrake Tablet Case | Harry Potter DIY


For some reason the Harry Potter series is like a crafting muse for me. I have a notepad filled with all sorts of ideas that I'm regularly adding to. Last week, when I booked tickets to go to Harry Potter Studio Tour, my brain went into crochet overdrive and I had to make something to get my crafting energy to calm down. The trip will be my second, but I'm beyond excited as it will be at Christmas and with my sister, who loves the wizarding world as much as me.

I decided I needed a case for my tablet as it will be travelling with me and I don't have one.
When my brain is full of ideas I like to use an A4 pad to map everything out and it helps me come to a decision. With this project I had a couple of Ravenclaw themed ideas first and then I just saw a baby mandrake plant fully formed in my head.

I knew it would be a crocheted case and as soon as I had my design sketched out I went searching for the right yarns.


I decided on Sirdar Wash 'n' Wear Double Crepe DK in brown and duck egg for the main body of the case as I wanted something fairly durable. For the Mandrake itself, well they're a bit magical so I needed something a more special than 'normal' yarn. I decided to go with Sirdar Softspun Luxury Soft DK in goldie and green as it has a beautiful shimmer to it and it makes the Mandrake jump out of the background. I'm terrible at taking photos, so you'll have to trust me!

For the eyes I used a black sparkly Jomil Starmist crochet thread. I bought mine from a sale bin at my local yarn shop for £1, so have a look around, as the when I searched for it online so I could give you links it was selling for £7 which is frankly ridiculous!

Anyway, what do you think of the finished product? I'm really happy with how it turned out

For the crochet lovers who want a bit more detail about what I did:

The body of the case is entirely single crochet (US) using a 4.00mm hook. I made a foundation chain the length of my tablet as the bottom and then for one round worked in the front loop only all the way around to make a 'corner' so that bottom and sides had a better shape. Then it was just plain old single crochet until it was big enough to entirely cover my tablet.

The Mandrake itself I made in seven pieces with a 3mm hook. (Head, body, 4 limbs and 2 leaves) I made each part free form, but using mostly single crochet, with the odd half-double, and double to make it look a bit gnarly and root-like. The body and head were made as off circles with random increases, decreases and missed stitched to alter the shape. I basically just eye-balled it.

The leaves I based loosely off the Fern leaf pattern from 100 Flowers to knit and Crochet. (If you haven't had a look through it before, I can't recommend it enough)

The eyes were little knots made with a darning needle.

The features were made with a 2.5mm hook in a chain on top of the face. I did a little down-turned mouth shape and frowning eyebrows, although it's fairly hard to see. If I did it again, I'd probably use a bigger hook for that part. Or perhaps a slightly darker shade of yarn.

When I had crocheted all the body parts together, I loosely pinned it on the case and sewed it into place with a large darning needle. I actually remembered to a few photos here and there in case anyone fancies having a go themselves and finds them helpful.


Sunday, 10 July 2016

2 Crochet Hooks - Tea for Two

Hi everyone! This is just a quick little post to let you all know that 2crochethooks.com have had me as their guest this week, on their Tea for Two feature. If you haven't come across their site before, it's a great place to find free patterns, inspiration and new blogs to binge on.

Pop on over and find yourself another project to add to your list, perhaps something festive, July 'tis the season for Christmas Crochet after all.


Monday, 14 March 2016

Crochet Spring Daffodil | Pattern

At this time of year with Spring and Easter right around the corner I always get the urge to start crocheting Daffodils. They were the very first flower I ever crocheted, so I have a soft spot for them. There are a myriad of patterns for them out there. However, when I couldn't find the 'perfect' one after lots of Pinterest and googling they became the first thing I ever made my own pattern for.

Each year I end up going back to it and refining it and changing it as my crochet skills and knowledge of stitches grows. This year I think I'm finally happy.

I used a stitch that I'm not certain of the name of on the outer petals as it makes them ever so slightly pointier. (Too roundy petals was my problem with other daffodil patterns.) It might be two double trebbles together, or as there are a lot of other stitches in the same stitch is it a type of puff stitch?

I've put the pattern down below, and tried my best to note down the stitch I used on the outer petals. I also made a video of me making a petal. Does anyone know what I should be calling it?

Anyway, here are some pictures of the final product and a video of how I make the petals. I think I might whip stitch a brooch on the back and put it on my coat. Or maybe make a whole vase of crocheted Daffs. What do you think?


Crochet Daffodil Pattern

The flower is made in two parts. The outer petals and the inner petals. The pattern is written in US Crochet terms.

Abbreviations:

CH = chain
SS = slip stictch
SC = single crochet
HDC = half double crochet
DC = double crochet
TR = treble crochet
DTR = double treble crochet
YO = yarn over

Inner Petals

To begin: CH3,SS in first CH to make a loop.
Round 1. CH1, 6SC in the loop. SS to first SC to join.
Round 2. CH4 (this counts as a TR) 2TR in the front loop of each SC around, with the exception of the final SC. Make 1TR in this stitch and SS to the top of the CH4 to join.

Fasten off and weave in your ends.

Outer Petals

To begin: CH4, SS in first CH to make a loop.
Round 1. CH1, 6SC in the loop. SS to first SC to join.
Round 2. CH1, 2SC in each SC around. SS in first SC to join (12 SC)
Round 3. CH1, (2SC in next 2 SC, SC in next SC) around .SS in the first SC to join (20 SC)
Round 5. CH1, (SC,HDC,DC,TR in the next SC. In that same stitch DTR2TOG SC around the most recent DTR post then continue to work a TR, DC, HDC, SC in the same stitch you placed the second of your DTR. SS in the next two SC) around.

Fasten off and weave in your ends. Attach the two flower parts together in your preferred method.


Friday, 29 January 2016

Crochet Car Basket

I'm a member of the UK Survival Network (UKSN) and one of their posts in January was asking us all to start a DIY project that either allowed us to develop new skills, or improve our existing ones. I decided to take this as an opportunity to try a crochet technique I'd not used before.

Recently we went from having one large family car to having two smaller ones. I now have a little Fiat Panda all to myself, which I love, but I haven't put any 'emergency supplies' in it yet. With Winter finally starting to bite, I want to leave some items permanently in the car in case I was stuck in it for a prolonged period.

My problem is that space is VERY limited. My pram just fits into the boot with a small triangle left over. To prevent things I want to store from falling over and going everywhere when I take the pram out I decided to make a crochet basket that fits the space exactly. This will save me from repacking the boot constantly and means all of my 'emergency' items are to hand when I need them.


I wanted the basket to be sturdy and to have handles, so I decided to use 7mm polypropelene rope, and to crochet over it with gardeners twine. I've wanted to try crocheting with twine for a long time and this seemed like the perfect project to finally give it a go. In the end I used 100m of Poly rope and roughly 320m of twine.


As I wasn't following a pattern I put paper down in my boot and drew out the shape that I wanted the basket to be. This meant I could check my work against this when making the base, without running out to the car all the time. I used a 4.5mm hook on the base as I wanted it to be fairly sturdy and a 6mm hook on the sides as I wanted it to be a little looser and more flexible.


It may look a bit odd as it's not a conventional shape due to fitting round the pram, but I'm really happy with it. It might not be pretty, but it's functional! And I do love using something that I made myself rather than bought.


I had a big ponder about what supplies I would permanently leave in there as I had to be pretty ruthless with not having much space. I made a quick video about what I decided. If you fancy a nosy, click on the video below. And if anyone has any suggestions of things to add/switch out, please leave a comment and let me know.


Grey Flecked Crochet Scarf / Shawl


Roughly a year ago I posted asking for help, because I wasn't sure what to make with some yarn I bought. Well, I finally used it!

I ended up using a pattern called Coraline In The Wine Country from simplycollectiblecrochet.com, which Clare from the Youtube channel BobWilson123 has also done a video tutorial of.

I made mine in a chunky yarn with a 9mm hook, and I also made it slightly smaller as I wanted it to be a triangular scarf and not big enough to be a proper shawl. A wrap at most.

One of the things that I think is so wonderful about crochet is how a simple change of yarn or hook size can make the results of the project so different.

Anyway, voila! What do you think? It's a lovely pattern to follow. Simple and straightforward, so you can watch TV while you're crocheting and actually get to watch and not just listen! It worked up very quickly too.


Friday, 8 January 2016

I'm A Big Nerd And I Don't Care!

So, I usually tend to write about crochet. I have many varied interests that make me happy too and I've only just realised that the only thing stopping me from writing about them was myelf!

I adore Bethesda video games. Most of all, the Fallout franchise. Jumping-up-and-down squeaking-with-glee-when-the-postman-delivered-my shiny-new-copy-of-Fallout 4-on-release-day kind of joy. After playing it, I keep coming up with crochet ideas. For those not as cool as me, it's set in a post apocalyptic world which is populated by the decendants of people who had survived an atomic bomb by sheltering in vaults. 

After falling in love with the new installment I have a burning desire to make a grey and black blanket that looks like it has been issued to a vault dweller by Vault-Tec. My inner voice told me not to blog about that because 'the internet' would think I was weird for being thirty and playing video games, and then making crochet projects based on them. A few day ago I suddenly decided I don't really care anymore.

I have other non-crafty interests besides Fallout. I really like survival/bushcraft/prepping, whaterver you want to call it. The great outdoors and all that.

After watching many videos about the items other people carry about their person every day, I decided to make my own. Which I posted yesterday. And, I made it in my pyjamas, with no make-up on. Even though I was tempted to put uncharacteristic amounts of slap on I thought if I'm going to be brave about all parts of the real me, I really sould be the real me, right? Sot, no make-up. and as I made it at night after my little ones were asleep, I'm in my jim jams, and half whispering.


If you're into that sort of thing too, feel free to have a look. Or if you're just generally wondering what's in my bag after reading all of this, knock yourself out.

So basically, I'll be posting a lot more, and not just about crochet. It could be cooking, or books, or my favourite mods for a fictional sniper rifle. Just giving you all fair warning.

Friday, 27 February 2015

Exciting News!

I haven't posted for a while, although I have wanted to. There's been so much going on lately that I haven't had much room/energy for creative things. Ideas constantly pop up in my head, but so far I'm saving them for the magical day I wake up with unlimited free time.

So what has been keeping me busy? Firstly, me and my fella are buying the loveliest little house ever. I fell in love with it straight away and I can't wait to move in. It's current decor is firmly stuck many many decades into the past, which I was actually really happy about as I'm not a fan of a lot of recent home fads. I'd much rather live with faded fashions from years gone by than a modern day horror while we restore room by room.

I'm going to have so much fun transforming this house and turning it into our family's home. I promise to take lots of pictures along the way. My mind is running wild with potential new projects for the new house. Once we're in I'm planning to have a go at rag rugging which I've wanted to do for sooooooo long. Not one to start small, I want to make a big kitchen rug, and I plan to use all of the t-shirt yarn in my stash to do it. Lots of lovely blues, greens and whites. I have two packs of the little balls pictured, and two big bobbin things of a sage green colour and one of white.

I started making a mandala type rug when I initially decided to try t-shirt yarn out, then I frogged it and it's been waiting for it's time to shine ever since and I think that a big rag rug is the way to go. Some kind of seaside/wave type theme I think. I can see seaweed and white crests and swirling blues.


In addition to moving soon I also have roughly seven weeks left before our second (and final!) baby is with us. I just know I'm going to end up in labour on moving day. I have a week of work left before I go on maternity and as much as I would love to spend it relaxing, crocheting baby clothes and blankets, I'll be packing and running around after my first little monster who is now seventeen months and massive. 

So, I may be a little absent from the world of blogging while I get packed, moved, unpacked and then welcome our new family member, but once we're in a routine in our lovely new time-warp house I will be posting all sorts of crafty/decorating pictures.

Sunday, 25 January 2015

Scarf In Progress

Thank you to everyone who helped me decide what to do with my January sale yarn. I've decided to make a scarf. Once I knew that was what I wanted to make I got a picture in my head straight away of how it should look. Now I'm working it up, I keep making little amendments, frogging a few rows, changing something, getting another idea and frogging again. I'm thoroughly enjoying myself though.

One of the things I love most of all about crochet is being able to turn ideas in my head into actual real life objects. And they actually turn out like how I imagined them! This never happened when I tried to draw as a child. I had such high hopes whenever I started drawing, but the beautiful horse I envisaged always ended up looking like a mangled running potato. I just hadn't found my medium. 

Crochet clicked and I'll be forever grateful to the lady that started me off, as well as to all the lovely blogs and youtube channels spreading crafty love.

I got the idea of using a water jug as a yarn bowl after seeing a photo of somebody who had used a tea pot. I'd been on the hunt for the perfect yarn bowl or spinner for ages to no avail. I was scrolling through my google plus feed a few days ago and I realised I had plenty of things that would work perfectly already.

Anyway, I'm itching to get back to my latest woolly creation. The yarn does look lovely worked up and I know when I finally get the pattern perfect all the frogging will seem worth it. 

I'm actually writing the pattern down as I go for once. So I have a book full of scribbles. I get the feeling my sister might want one when I finish so I want to be able to duplicate it. I have the perfect yarn in mind already. I'll write it up when it's finished, which will hopefully be in a few days and share it on here as well in case anyone fancies making one too.


Thursday, 15 January 2015

Ideas Please

I've bought some yarn in the January Sale from my local wool emporium and I'm not sure what to do with it. As it's January, and I'm making my annual attempt at being more sensible with money, I had only gone in 'for a look'.

I could honestly spend hours pawing and poking at all the lovely yarn in there. Drooling over everything and getting filled with ideas for projects that require more time than I have to spare. 

I ended up buying five 50g balls of Sirdar Husky, Super Chunky in a soft grey colour with black flecks. I know I've only just finished my Jumbo Infinity Scarf but I thought perhaps a smaller cowl? Or a jumper that is more holes than solid fabric? I've wanted to make a post apocalyptic/dysatopian looking jumper for ages. I don't think I'd have enough for something like that though.

Maybe some kind of non-frilly sort of shawl/small poncho type thing. I just don't know. But I love the grey shade and it's nice and soft so I need to make it into something! Please please please lend me your creative minds and throw a few suggestions at me.

Saturday, 10 January 2015

How I made my Hermione Inspired Hand Warmers

I was asked if I had a pattern for the Hermione Inspired Crochet Hand Warmers and as I made them up as I went along I've jotted down some instructions in case anyone else fancies making a pair. They're pretty simple and work up really quickly. I just hope these dodgy pictures and explanation makes sense!


I used Sirdar Escape DK yarn in 179-Endeavour and a 5mm hook. This is written in US terminology.

1. I made the ribbed cuff first. I chained five plus one for the turning chain. I worked single crochets in the back loop only.When the strip was long enough to fit over the largest part of my hand I finished off and joined it together with the long tail I left for sewing.


With it being ribbed it's a bit stretchy so don't make it too loose or once it gets over your hand it will be too baggy.


2. Then I made the main body of the warmers.  As the ribbed cuff is now on it's side, I added the single crochets in the stitches at the ends of the rows and the gaps in between. When you get to the end of the round slip stitch into the first single crochet to join, chain one, thenturn. Make sure you're crocheting through both loops. I think I made a slight increase on the second round so that I ended up with roughly 23 stitches in each, but you'll be making them to fit you so may have more or less. Keep going until you get to your wrist then make a few increases each round (I eyeballed this) so that it becomes wide enough for your hand.

Then just keep on single crocheting until you get to the bit where you would want the opening for the thumb to start. I hope this next bit makes sense....


3. Single crochet along the row as normal and then where the thumb bit would start make a chain of however many you need to comfortably stretch across to the same point on the other side, slip stitch to join and then continue single crocheting the rest of the round. 

You've basically just skipped the stitches that would go round your thumb. 

On the next round single crochet along as normal, put one single crochet in each chain across and just continue when you get to the other side. You're basically just carrying on as you were, but there are now just less stitches in the round. 

4. When you get high enough up on your fingers, for the last round instead of single crocheting in each stitch: slip stitch, then single crochet, then half double, half double again, single crochet and slip stitch again. All the way round, so that you get a slight wave at the top. Cut your yarn and finish off.

5. For the thumb. Join your yarn at the opening and put one single crochet in each stitch all the way around including into the chain across. (You will have already worked into this for the main body.) This will make a little thumb tube. Keep working rows, you may want to decrease here and there so it narrows a little towards the skinnier bit of your thumb. On your last row make a wavy edge as above and you're done. 

This post turned out way longer than I thought it would, I tried not to waffle, I really did! I hope it made sense, but feel free to ask any questions if not.


Thursday, 8 January 2015

Hermione Crochet Fingerless Gloves | Harry Potter DIY

After finishing my Jumbo Infinity Scarf I decided I needed something for my digits. I already have a lovely pair of mittens, but I hate that you have to take them off to check your phone or rummage in your bag. Hand/wrist warmers seemed perfect. I've also been ill this week and nothing makes me feel better when I'm snivelly and sorry for myself than watching Harry Potter. Specifically, Deathly Hallows Part One, as it's my favourite.


Hermione wears a really lovely pair of hand warmers in it. I won't add a picture as I don't think that's allowed copyright-wise, but you probably know the ones I mean! If you don't a quick Google search will pop up plenty of pictures.

After a pausing and staring for a bit I think they're probably knitted. It's the stripy palette that I like the best though and the cosy look of a jumper with too big sleeves. As a red-head the pink section of the colour wheel is something I avoid as it's does nothing for me. But I do love blues, greens and greys and browns and I had something in my yarn treasure chest that needed using. When I bought the Sirdar Escape Chunky that I used for my infinity scarf I also bought some of the non chunky variety in Endeavour. I love January wool sales.


The colour changes are more obvious in the dk than the chunky and I thought it might give me a subtle stripe without the faff of actually changing yarns. I made them with a ribbed cuff and then plain single crochet (US) double crochet (UK) all the way to the top. I decided to add a little wavy shell edge which Hermione doesn't have on hers. It's an inspired by project though not a recreation and I thought it looked softer than a straight edge.

They were just one days work. I'll be wearing them with my Jumbo Infinity Scarf some of the time and although they don't match like twins they are perhaps sisters. I took them for a spin pushing the pram to the post office yesterday and they made me smile. Toasty hands but free fingers.

One last thing, please tell me I'm not the only person who sometimes pauses films so they can stare at knitwear? I feel a bit mad when I see a 'good' shot and shout 'Pause it! Pause it!', so I can stare at woollies.

Tuesday, 6 January 2015

Jumbo Infinity Scarf

I've always been the kind of person who only wears a coat when it's absolutely Baltic. I used to get a bit stroppy when I was a teenager and my parents would seem to ask pretty much every time I went out, 'don't you think you should be wearing a coat in this weather?' 

Lately, it's been my fella asking me. He's lovely, but gets super over protective when I'm pregnant.

Up until now we've had a fairly mild winter in Blighty. Between jeans that have an elastic band that reaches to my bra, a camisole, top and an extra person sharing my skin I've been toasty warm. However, we had snow on Boxing Day and since then the weather has been cold enough for me to hunt my coat out only to find it won't close over my growing belly.

Buying a pregnancy coat seems silly to me as I'll only wear it for a few weeks before discarding it again, so I decided to make a really long thick infinity scarf that can drape over the section that won't close. Afterwards, when I'm back to normal, I can wear it alone to keep toasty during that bit of the year where wearing your full winter gear is too hot, but an extra layer is handy.


I had some Sirdar Escape Wool Rich Chunky knocking about for ages and I loved it, but I wasn't sure what to do with it. Well now is it's time to shine and I've got to say the colour transition is sooooo pretty. I'm really happy with how it looks worked up. It looks much better in real life than in my terrible photos! 

The pattern is a free one I found on Lacy Crochet. With using such chunky wool I didn't want a solid fabric and this lacy pattern works perfectly. Warm and pretty. I decided for an infinity scarf versus a normal one because I hate faffing around with even/uneven ends.


It worked up really quickly and I finished it this evening. What do you think? I could only manage to get a photo of it on my own when it's doubled up. When there is no urgent football on, I'll get my other half to take one when its just a big chunky loop.


Sunday, 28 December 2014

Unfinished Business

So it seems that carrying over a Christmas Crochet Project from one year to the next is now a tradition of mine.

Instead of the piles of green yarn and hooks on the side table next to my chair there is now hot chocolate and minced pies.

I came so close to finishing my wreath, but not quite. I reckon another six inches of stripes and then the sewing onto the polystyrene half wreath and I would have been done. I'm choosing to see this not as a failure, but as giving myself a big head start on next year!

At least I got all of my crochet baubles done. I've really enjoyed looking at my woolly tree this year, so much that I think they may become permanent features in years to come. Perhaps I'll add some gold lame string next year for a bit of extra sparkle.

Am I the only one who didn't manage to finish their whole list of things to make? With New Year almost upon us I'm already thinking about my next non-festive project, as well as having a big Spring clean and re-organisation of how I store my yarn and craft bits and bobs. Any suggestions would be much appreciated.