Amazon Prime

Showing posts with label Harry Potter. Show all posts

Friday, 22 July 2016

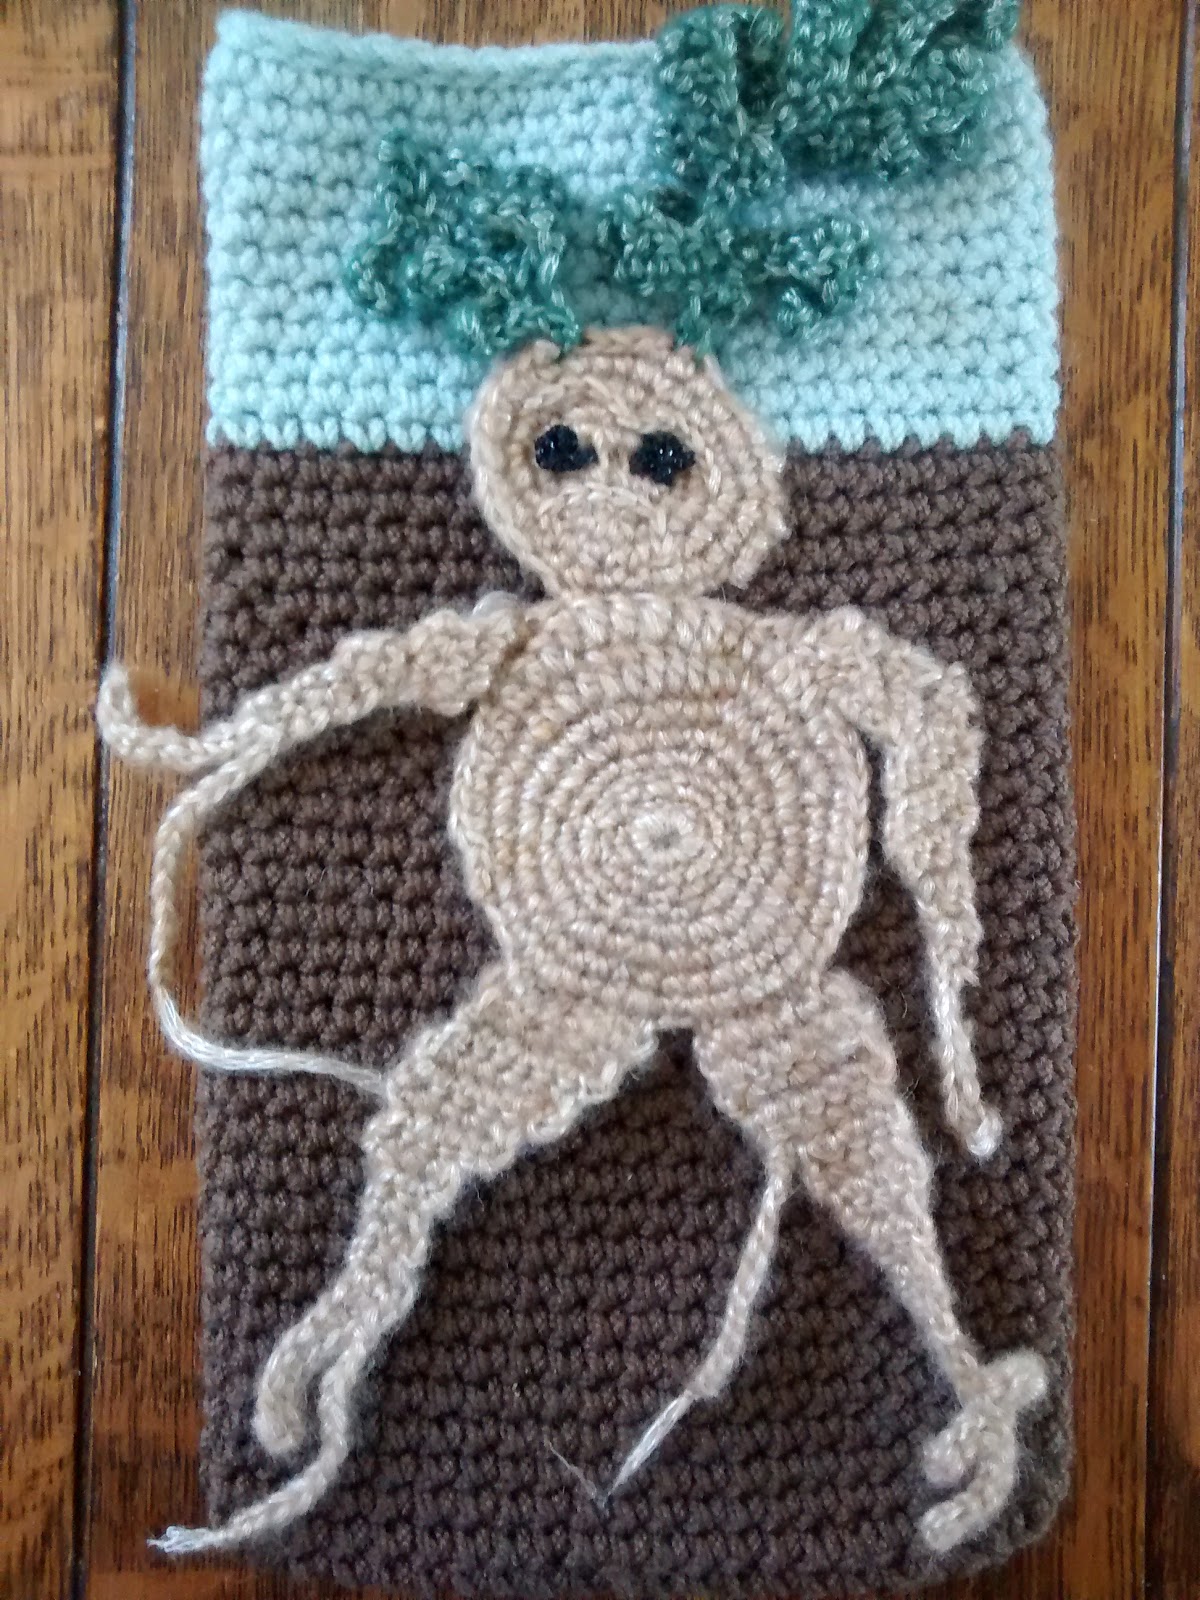
Crochet Mandrake Tablet Case | Harry Potter DIY


For some reason the Harry Potter series is like a crafting muse for me. I have a notepad filled with all sorts of ideas that I'm regularly adding to. Last week, when I booked tickets to go to Harry Potter Studio Tour, my brain went into crochet overdrive and I had to make something to get my crafting energy to calm down. The trip will be my second, but I'm beyond excited as it will be at Christmas and with my sister, who loves the wizarding world as much as me.

I decided I needed a case for my tablet as it will be travelling with me and I don't have one.
When my brain is full of ideas I like to use an A4 pad to map everything out and it helps me come to a decision. With this project I had a couple of Ravenclaw themed ideas first and then I just saw a baby mandrake plant fully formed in my head.

I knew it would be a crocheted case and as soon as I had my design sketched out I went searching for the right yarns.


I decided on Sirdar Wash 'n' Wear Double Crepe DK in brown and duck egg for the main body of the case as I wanted something fairly durable. For the Mandrake itself, well they're a bit magical so I needed something a more special than 'normal' yarn. I decided to go with Sirdar Softspun Luxury Soft DK in goldie and green as it has a beautiful shimmer to it and it makes the Mandrake jump out of the background. I'm terrible at taking photos, so you'll have to trust me!

For the eyes I used a black sparkly Jomil Starmist crochet thread. I bought mine from a sale bin at my local yarn shop for £1, so have a look around, as the when I searched for it online so I could give you links it was selling for £7 which is frankly ridiculous!

Anyway, what do you think of the finished product? I'm really happy with how it turned out

For the crochet lovers who want a bit more detail about what I did:

The body of the case is entirely single crochet (US) using a 4.00mm hook. I made a foundation chain the length of my tablet as the bottom and then for one round worked in the front loop only all the way around to make a 'corner' so that bottom and sides had a better shape. Then it was just plain old single crochet until it was big enough to entirely cover my tablet.

The Mandrake itself I made in seven pieces with a 3mm hook. (Head, body, 4 limbs and 2 leaves) I made each part free form, but using mostly single crochet, with the odd half-double, and double to make it look a bit gnarly and root-like. The body and head were made as off circles with random increases, decreases and missed stitched to alter the shape. I basically just eye-balled it.

The leaves I based loosely off the Fern leaf pattern from 100 Flowers to knit and Crochet. (If you haven't had a look through it before, I can't recommend it enough)

The eyes were little knots made with a darning needle.

The features were made with a 2.5mm hook in a chain on top of the face. I did a little down-turned mouth shape and frowning eyebrows, although it's fairly hard to see. If I did it again, I'd probably use a bigger hook for that part. Or perhaps a slightly darker shade of yarn.

When I had crocheted all the body parts together, I loosely pinned it on the case and sewed it into place with a large darning needle. I actually remembered to a few photos here and there in case anyone fancies having a go themselves and finds them helpful.


Tuesday, 12 July 2016

I Want to Collect All of the Things!

I want to start by saying, I'm 31 year old Mother of two, which makes me an official grown up now, okay? So it's a given that I'm way too old to be collecting toys, but look! Would you just look at the tiny, adorable, Potter characters!


Funko are releasing Harry Potter Mystery Minis! I never collected things as a child and their Pop Vinyl figures never tempted me, but I really want a tiny little Minerva! Forbidden Planet put's their UK release date as 4th August, but I found some available on Amazon now and I'm so tempted to buy a whole box. Is it considered bad parenting to feed my children only beans on toast so I can buy myself toys?


Wednesday, 17 February 2016

Galleon, Sickle and Knuts Jars | Harry Potter DIY

Like Many people I save my change.  I started out just using one big glass jar. To save time sorting once it gets full I began using a smaller one too, for smaller change. The jars just looked a bit 'blah' though, and as they're always out on display I thought maybe I should jazz them up a bit.

As a Harry Potter fan I wanted a wizzardy theme, and decided I would simply label the jars as if I was Molly Weasley and they were in the The Burrow. The large one for my coppers would be 'Knuts', the smaller jar for silver change would be 'Sickles' and I decided to add a tiny third jar for my 'Galleons' (or two pound coins).


I wanted the jars to look like they had been sat around The Burrow for many years being used to save up for Hogwarts lists, and so look a little shabby. I used plain A4 drawing paper for the labels, but gave it a light tea wash to make it look a bit more like parchment paper.
I tore all the edges rather than leaving a clean line from scissors and I wrote in a brown fine pen so it looked a little like quill ink that had faded over time.


Finally, I gave the whole jar a coat of matte Mod Podge when affixing the label, and then another all over once it was dry. This made the glass look less shiny and new, and more well worn and grimy.

As the 'Knuts' label was the largest and was a little wrinkly from the tea wash it got a few air bubble lines when getting stuck down, but I love it all the same.


That's it! What to you think?


Saturday, 10 January 2015

How I made my Hermione Inspired Hand Warmers

I was asked if I had a pattern for the Hermione Inspired Crochet Hand Warmers and as I made them up as I went along I've jotted down some instructions in case anyone else fancies making a pair. They're pretty simple and work up really quickly. I just hope these dodgy pictures and explanation makes sense!


I used Sirdar Escape DK yarn in 179-Endeavour and a 5mm hook. This is written in US terminology.

1. I made the ribbed cuff first. I chained five plus one for the turning chain. I worked single crochets in the back loop only.When the strip was long enough to fit over the largest part of my hand I finished off and joined it together with the long tail I left for sewing.


With it being ribbed it's a bit stretchy so don't make it too loose or once it gets over your hand it will be too baggy.


2. Then I made the main body of the warmers.  As the ribbed cuff is now on it's side, I added the single crochets in the stitches at the ends of the rows and the gaps in between. When you get to the end of the round slip stitch into the first single crochet to join, chain one, thenturn. Make sure you're crocheting through both loops. I think I made a slight increase on the second round so that I ended up with roughly 23 stitches in each, but you'll be making them to fit you so may have more or less. Keep going until you get to your wrist then make a few increases each round (I eyeballed this) so that it becomes wide enough for your hand.

Then just keep on single crocheting until you get to the bit where you would want the opening for the thumb to start. I hope this next bit makes sense....


3. Single crochet along the row as normal and then where the thumb bit would start make a chain of however many you need to comfortably stretch across to the same point on the other side, slip stitch to join and then continue single crocheting the rest of the round. 

You've basically just skipped the stitches that would go round your thumb. 

On the next round single crochet along as normal, put one single crochet in each chain across and just continue when you get to the other side. You're basically just carrying on as you were, but there are now just less stitches in the round. 

4. When you get high enough up on your fingers, for the last round instead of single crocheting in each stitch: slip stitch, then single crochet, then half double, half double again, single crochet and slip stitch again. All the way round, so that you get a slight wave at the top. Cut your yarn and finish off.

5. For the thumb. Join your yarn at the opening and put one single crochet in each stitch all the way around including into the chain across. (You will have already worked into this for the main body.) This will make a little thumb tube. Keep working rows, you may want to decrease here and there so it narrows a little towards the skinnier bit of your thumb. On your last row make a wavy edge as above and you're done. 

This post turned out way longer than I thought it would, I tried not to waffle, I really did! I hope it made sense, but feel free to ask any questions if not.


Thursday, 8 January 2015

Hermione Crochet Fingerless Gloves | Harry Potter DIY

After finishing my Jumbo Infinity Scarf I decided I needed something for my digits. I already have a lovely pair of mittens, but I hate that you have to take them off to check your phone or rummage in your bag. Hand/wrist warmers seemed perfect. I've also been ill this week and nothing makes me feel better when I'm snivelly and sorry for myself than watching Harry Potter. Specifically, Deathly Hallows Part One, as it's my favourite.


Hermione wears a really lovely pair of hand warmers in it. I won't add a picture as I don't think that's allowed copyright-wise, but you probably know the ones I mean! If you don't a quick Google search will pop up plenty of pictures.

After a pausing and staring for a bit I think they're probably knitted. It's the stripy palette that I like the best though and the cosy look of a jumper with too big sleeves. As a red-head the pink section of the colour wheel is something I avoid as it's does nothing for me. But I do love blues, greens and greys and browns and I had something in my yarn treasure chest that needed using. When I bought the Sirdar Escape Chunky that I used for my infinity scarf I also bought some of the non chunky variety in Endeavour. I love January wool sales.


The colour changes are more obvious in the dk than the chunky and I thought it might give me a subtle stripe without the faff of actually changing yarns. I made them with a ribbed cuff and then plain single crochet (US) double crochet (UK) all the way to the top. I decided to add a little wavy shell edge which Hermione doesn't have on hers. It's an inspired by project though not a recreation and I thought it looked softer than a straight edge.

They were just one days work. I'll be wearing them with my Jumbo Infinity Scarf some of the time and although they don't match like twins they are perhaps sisters. I took them for a spin pushing the pram to the post office yesterday and they made me smile. Toasty hands but free fingers.

One last thing, please tell me I'm not the only person who sometimes pauses films so they can stare at knitwear? I feel a bit mad when I see a 'good' shot and shout 'Pause it! Pause it!', so I can stare at woollies.